GNSS guidance is the preferred correction option if the use of a base station or CORS RTK network is not desired. It does not require cellular connection after initial setup.
- Download GNSS update on flash drive via ASD Knowledge Hub
(Skip this step if the system was updated before shipping - Verify your GNSS version number matches the one in bold below.)
- Make sure flash drive is formatted to FAT 32 for Android. Use caution when reformatting as other drives could be wiped accidentally if they are selected.
- Download update here: UM982_R4.10Build11826.gnss6
- Minimize the autosteer app and go to File Manager + on the home screen of the Android monitor. Confirm your flash drive is being recognized and contains the GNSS update file.
- Press and hold the file icon for the update. Select “Other” > “Certificate Installer” > “Just Once.”
- Return to the “Nav Terminal" (Autosteer app) on the home screen and reopen
- Go to the “Version Upgrade” page in settings. Click “Update” on the GNSS tab
- Should say “Update Success” if complete
- RTK state will say “Single Point.” “Fixed” state is required to begin calibration. This will be addressed as you continue the setup.
- Click the “Auto Search” tab at the top of the screen
- Select either of these options under 'Auto Search:’
-SBAS- Quick to reach "Fixed" state. Reliable WAAS connection in the U.S.
-E6-HAS- Higher accuracy potential (PPP), but much longer connection startup time - OR if you are using RTK, input your cellular RTK credentials or radio base station info under the "Manual Selection' tab.
- Check the box next to “Reset GNSS,” then press “OK.”
- After selection, RTK state will say "Single Point" or “Psuedorange.” Continue to step 3.
- If “SBAS” does not connect after the following steps, select "E6-HAS" from the “Auto Search” Tab. On the main screen, click the gray “Radio Station” tab in the top left corner.
- Select either of these options under 'Auto Search:’
- Drive machine to an open area without nearby buildings or trees. (100yd radius). Wait 10-15 Minutes for PPP (Precise Point Positioning) GNSS to connect.
- RTK state will start as "Single Point," change to "Pseudorange," and then become "Fixed." (Top Left in black bar)
- Number of satellites will reset to "0" and then begin to climb.
- Do not move tractor or touch the screen during this process (10-15 minutes).
- “Fixed” state is required to proceed with calibration and auto steering.
- Confirm Number of Satellites is adequate and map on home screen represents your location (Internet required for initial map). Click the blue globe icon in the upper right-hand corner to refresh the map.
- The tractor icon should appear on screen once the machine starts moving.
- Go to “Settings” and select “Quick Calibration"
-
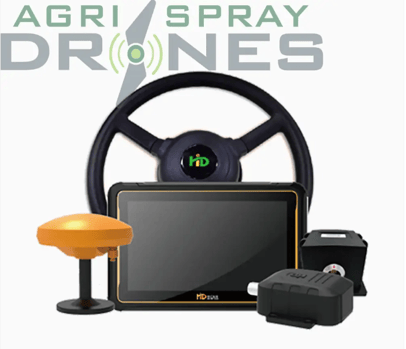
- Measure your machine and installed autosteer components based on the relevant diagram. Input these parameters. Ensure proper units of measurement are selected (Inches or CM). Units can be changed in system settings. Accuracy is key!
- If the gyro sensor has been installed on the front steering axle, confirm the gyro orientation and enter it. This is essential for proper calibration. If you have chosen not to install the gyro sensor, select “NONE WAS.” (Gyro recommended for all use, especially at operational speeds 6 mph +)
- General mode should be selected. This is ideal for most operations.
- On the Steering Parts Choice tab, select “Motor 5” when prompted
- Drive the machine to a flat, open area to complete the “Initialization check”. Wait 10-15 minutes for the system to restart. Do not touch the screen or move the tractor.
- Complete the calibration driving process as prompted.
- Once complete, the monitor will be capable of autosteer operation. The RTK state will remain "Fixed."
Click Here for GNSS Upgrade Manual
Click Here for an Auto Steering System (Full Kit)
Stay Informed: Subscribe to the Agri Spray Drones Newsletter
How to Subscribe
Subscribing is easy and takes less than a minute:
-
Visit Our Website
Go to www.agrispraydrones.com -
Scroll to the Bottom of the Homepage
Look for the “Subscribe to Our Newsletter” section. -
Enter Your Email Address
Type in the email address where you'd like to receive updates. -
Click “Subscribe”
Once you submit, you’ll be added to our mailing list and will start receiving valuable updates straight to your inbox.
Don’t Miss Out
Join thousands of ag professionals who trust Agri Spray Drones for the latest in drone spraying and precision ag.
Subscribe today — and let us help you take your operation to the next level.