PRODUCT LINKS:
Click Here for a new Full Set of J150 Propellers
Click Here for J150 CW Propeller Set (Only Props)
Click Here for J150 CW Full Propeller Assembly Set
Click Here for J150 CCW Propeller Set (Only Props)
Click Here for J150 CCW Full Propeller Assembly Set
Click Here for J150 Propeller Clamp Bracket
Quick Notes:
- Ensure you are installing the Correct Propellers CCW or CW for that Arm of the drone.
- Always check for loosening, look for cracks, chips, or any damage to Propellers (Props) before any flight.
- There are two washers for each prop (one on top of the prop, and one beneath). Keep track of these washers.
Key Steps To Remove Propellers
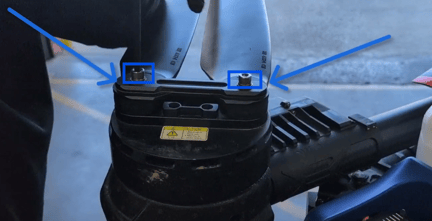
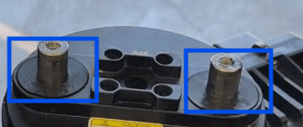
Step 1: Loosen Hex Heads
-
Locate the two 6mm hex heads on top of the J-150.
-
Use a hex wrench or impact tool to loosen both hex heads.
(Picture Shown Below).
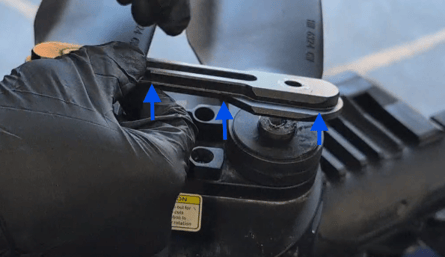
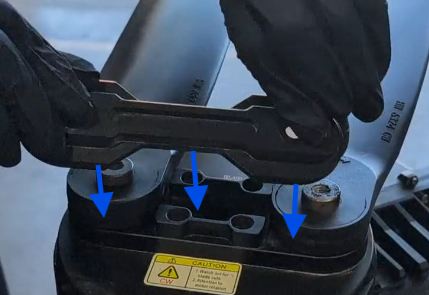
Step 2: Remove Top Bracket
-
Carefully remove the top bracket by lifting up.
-
If it is stuck, use a wedge tool to gently pry it off.
(Picture Shown Below).
Click Here for J150 Propeller Clamp Bracket
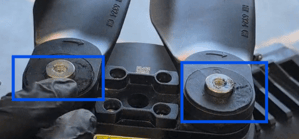
Step 3: Remove Top Washer
- Remove the top washer by lifting it up.
(Picture Shown Below).
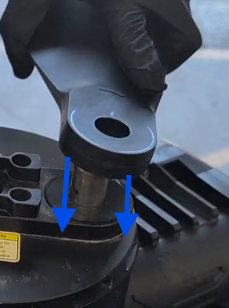
Step 4: Remove Propeller
- Slide the Propeller up and off by lifting it up.
(Picture Shown Below).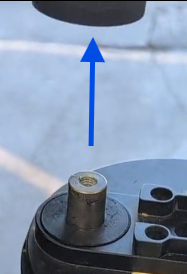
Step 5: Remove Bottom Washer
-
Identify the bottom washer with a gap.
-
Use a knife or similar tool to pop off the bottom washer if replacement is needed.
(Picture Shown Below).
Key Steps To Install Propellers
Step 1: Install Bottom Washers
- Put the bottom washers back on first.
(Picture Shown Below).
Step 2: Slide Propellers Back On.
- Ensure the lower washer gasket is in place before sliding the new props back on.
-
Slide the propellers back on to the motor by sliding them down.
(Picture Shown Below).
Step 3: Reinstall Top Washers
-
Slide the Top Washers back onto the top of the propellers.
(Picture Shown Below).
Step 4: Put the Bracket Clamp back in Place
- Slide the bracket clamp back down into place on top of the top washers and propellers.
(Picture Shown Below).
Click Here for J150 Propeller Clamp Bracket
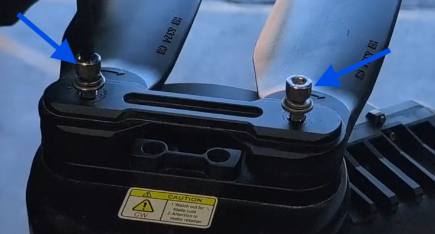
Step 5: Tighten Hex Heads
-
Apply blue Loctite to the two 6mm hex heads before tightening.
-
Tighten the hex heads by hand, ensuring they are snug but not overly tight.
(Picture Shown Below).
Step 6: Test Tightness
-
Check the tightness by moving the motor:
-
If the props spin freely while the motor is turned, they are too loose.
-
If the props do not move at all, they are too tight.
-
-
Adjust the tightness accordingly, aiming for equal tension across all blades.
Tips for Efficiency
-
Organize all parts (washers, props, tools) in a designated area to prevent loss during the process.
-
Perform a final inspection after installation to ensure everything is secure.
PRODUCT LINKS:
Click Here for a new Full Set of J150 Propellers
Click Here for J150 CW Propeller Set (Only Props)
Click Here for J150 CW Full Propeller Assembly Set
Click Here for J150 CCW Propeller Set (Only Props)
Click Here for J150 CCW Full Propeller Assembly Set
Click Here for J150 Propeller Clamp Bracket
Stay Informed: Subscribe to the Agri Spray Drones Newsletter
How to Subscribe
Subscribing is easy and takes less than a minute:
-
Visit Our Website
Go to www.agrispraydrones.com -
Scroll to the Bottom of the Homepage
Look for the “Subscribe to Our Newsletter” section. -
Enter Your Email Address
Type in the email address where you'd like to receive updates. -
Click “Subscribe”
Once you submit, you’ll be added to our mailing list and will start receiving valuable updates straight to your inbox.
Don’t Miss Out
Join thousands of ag professionals who trust Agri Spray Drones for the latest in drone spraying and precision ag.
Subscribe today — and let us help you take your operation to the next level.