Shapefiles can be exported from outside software such as JD OpsCenter and imported into the EAV online platform. The process below outlines import procedures for a complete shapefile package. If the package cannot be imported as seen above, the .shp can be converted to a .kml file and then imported using the same menu.
If you are still using the older EA CRM platform, proceed to 7:07 in the video.
1. Export from John Deere OpsCenter
- In John Deere OpsCenter, select the fields you want (e.g., select all fields for a client/farm).
- Export them — this gives you a ZIP file containing the shapefile (.shp, .dbf, etc.).
- If the export is saved as a normal folder and not a ZIP file, it will not import. You must zip the folder.
- If the export is saved as a normal folder and not a ZIP file, it will not import. You must zip the folder.
2. Open the EAVision Smart Farm / MapCloud web platform 0:21
- Use the EAVision Smart Farm web platform on a computer (also called EAV MapCloud).
- This is the newer, more streamlined system for plot and boundary management.
- It replaces the older CRM workflow, though the CRM still exists.
3. Upload as a new Plot or under a demand 0:40
- Click Upload.
- Choose the appropriate demand / work order.
- If you have not created one yet, you may see a default option.
- Best practice: separate fields by work order or client for easier organization.
- In the example, the uploader uses a work order called TM work order and saves it with a date/number.
4. Set upload options before importing the shapefile 1:06
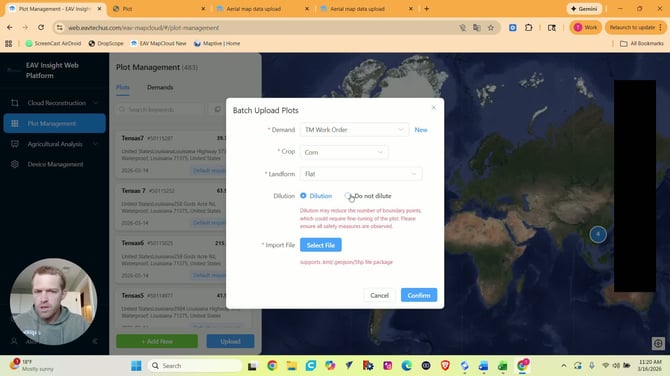
- Add optional details like:
- Crop
- Landform
- Choose whether to dilute the boundary points.
- Why dilute?
- John Deere boundaries often contain a very large amount of points, especially around turns and edges.
- Diluting simplifies the shape and makes later editing easier.
- If you want the raw boundary points, choose Do not dilute. Caution: this may cause the map to load more slowly and editing will be very time consuming.
- Field boundaries can be edited later via EAV insight platform or the Survey function on the controller prior to operation.
5. Upload the John Deere OpsCenter boundary ZIP file 1:44
- Click "Select File" and choose the exported OpsCenter boundaries ZIP file from John Deere.
- John Deere exports multiple fields together as a ZIP containing the shapefile components.
- Click Open to load the file into EAVision.
6. Map the plot name column and confirm the import 2:13
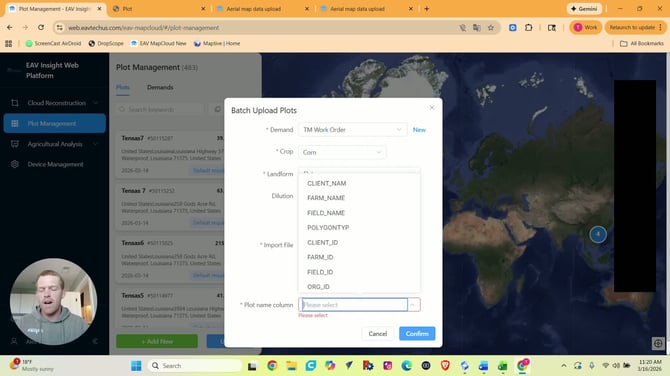
- The system will ask you to choose a plot name column from the shapefile’s DBF data.
- Pick the field that matches your naming convention, usually:
- Field Name, or
- Field ID
- In most cases, Field Name is the best choice because it matches what you see in John Deere OpsCenter.
- The EA system will not allow you to import duplicates of the field using this method. Import the original version and then edit and duplicate as needed online using EA.
- Click Confirm to finish the import.
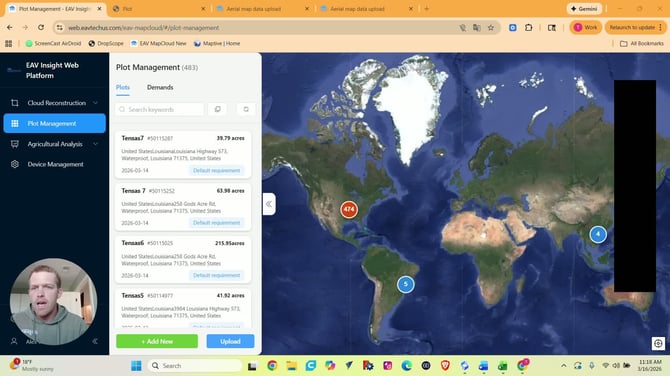
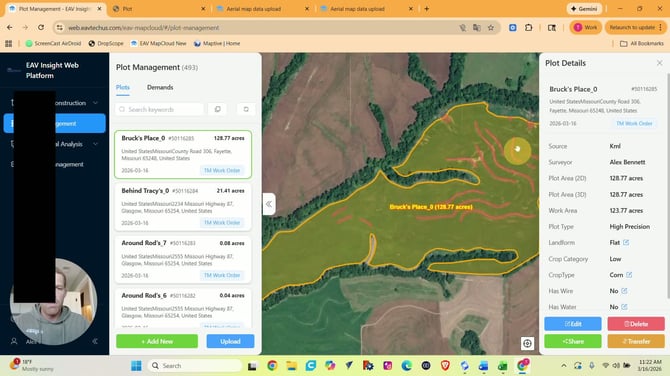
7. Verify that the fields imported successfullyin Plots list 2:29
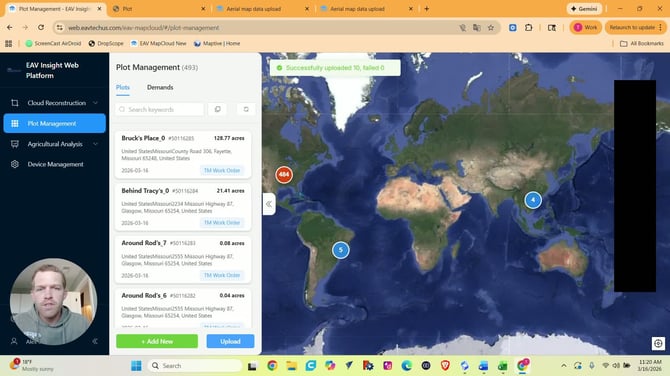
- Check the upload result summary in the Plots list or under your selected demand .
- In the example, 10 fields uploaded successfully and 0 failed.
- The imported fields appear in the top-right list and on the map.
8. Review how boundaries and internal areas are classified 2:44
-
Some internal areas may be classified as Obstacles or Boundaries - ensure these are classified correctly.
- If boundaries extend into the field, ensure there is enough room for the drone to plan a route.
-
IMPORTANT: In many cases, these are actually areas you do not want to spray, such as waterways and grassed terraces that may be classified as part of the boundary by John Deere. Those should be changed to No Spray Zones instead of obstacles if it is safe do so. This will allow the drone to create a more efficient route.
(see steps 9 and 10)
9. Convert obstacles to no-spray zones when needed 3:36

- Open a field and click Edit.
- Select the internal areas currently marked as obstacles.
- Drag them from Obstacles to No Spray Zones.
- Save and confirm the changes.
- Repeat this for other fields as needed.
10. Edit a boundary when part of the field should be excluded 4:23
- For more complex fields, you may want to trim the boundary instead of leaving the area inside it.
- Example: a waterway or strip inside the field should be a no-spray zone, and the field boundary should stop at that edge.
- First, create a No Spray Zone over the area you want to exclude.
- Then switch to Draw Boundary and remove the boundary points that extend into that area.
- This makes the boundary stop at the edge of the no-spray zone.
- Ensure obstacles are inside or to the edge of the field boundary
11. Use dilution to make boundary editing easier 5:39
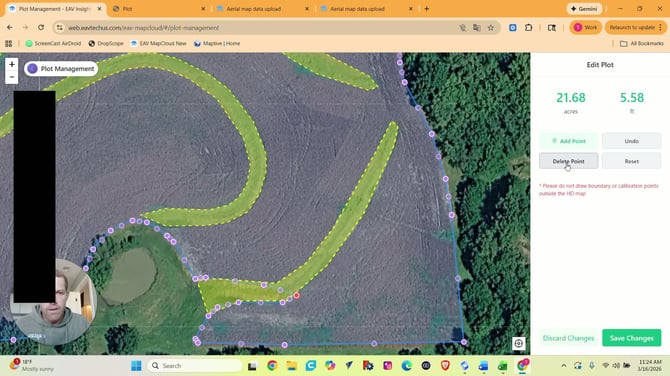
- If you selected Dilute during upload, the boundary will have fewer points.
- Fewer points make it much easier to edit curves and remove sections.
- Without dilution, the boundary may contain many more points and be harder to adjust.
12. Save the edited field and confirm the final result 6:00
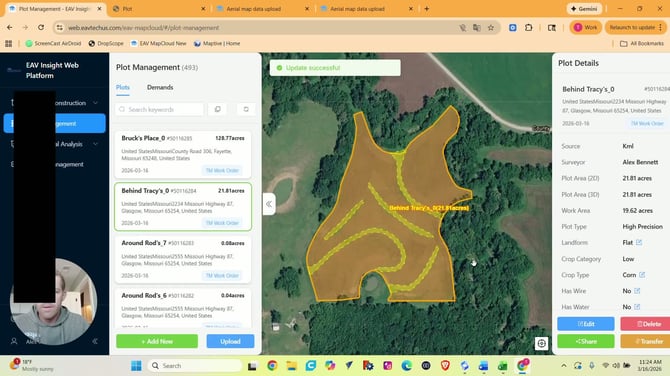
- After adjusting the boundary and no-spray zones, click Save.
- Confirm the changes when prompted.
- The field should now:
- Keep the sprayable area intact
- Exclude the no-spray area
- No longer treat those areas as obstacles or boundaries, increasing efficiency
This concludes the upload process using the new EAV online platform. If you are still using the older EAV CRM platform, proceed to 7:07 in the video.
Stay Informed: Subscribe to the Agri Spray Drones Newsletter
How to Subscribe
Subscribing is easy and takes less than a minute:
-
Visit Our Website
Go to www.agrispraydrones.com -
Scroll to the Bottom of the Homepage
Look for the “Subscribe to Our Newsletter” section. -
Enter Your Email Address
Type in the email address where you'd like to receive updates. -
Click “Subscribe”
Once you submit, you’ll be added to our mailing list and will start receiving valuable updates straight to your inbox.
Don’t Miss Out
Join thousands of ag professionals who trust Agri Spray Drones for the latest in drone spraying and precision ag.
Subscribe today — and let us help you take your operation to the next level.