Important Note: You will need to perform a Tank Weight Calibration prior to your first Spreader Calibration.
The Spreader Calibration is to ensure accurate material distribution during operation, and is vital when spreading product.
How to perform a Spreader calibration on the EAV J150
Key Steps
Obtain a pair of pliers, as this will help with the removal of the cotter pin for removing the spinner disc.
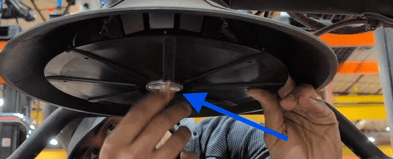
1. Remove Spinner Disc
-
Locate the spinner disc underneath the spreader.
-
Use pliers to remove the locking pin and set it aside.(You will need this when reinstalling the spinner disc)
-
Spin the bottom locking piece to the left to remove it.
-
Carefully remove the spinner disc and keep all parts together for reinstalling.
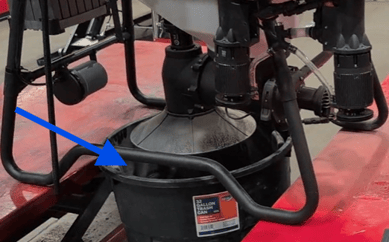
2. Prepare for Calibration
-
Place a trash can, bucket, or some kind of container underneath the spreader to catch material during calibration.
-
Lifting the drone over the container (using pallet jacks, tractors, or forklifts) to access the spreader easily is preferred.
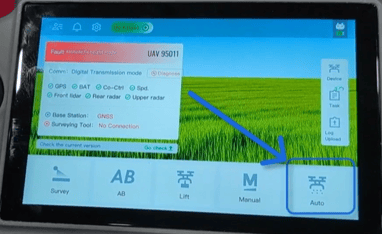
3. Access Calibration Settings
-
Turn on the drone completely.
-
On the remote controller screen, select 'Auto'.
-
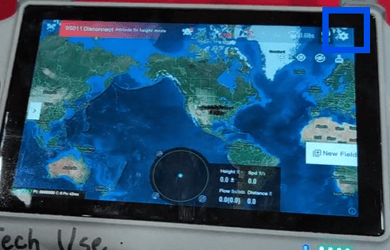
Select the Settings Icon in the top right corner.
-
Go to the 'Spreader' settings.
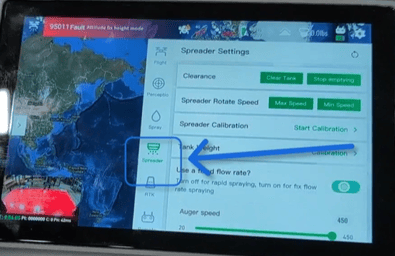
- Find the Spreader Calibration section, and on the right select 'Start Calibration.'
4. Perform Minimum Flow Rate Calibration
- Create a new template (e.g., 'Test') for calibration.
- Use the material of your choice for calibration and load it into the spreader tank.
- Set the auger speed to minimum and the time for calibration to 50 seconds. Then select 'Start Calibration'.
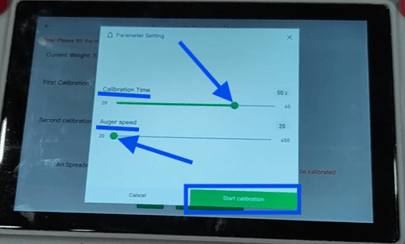
- Start the calibration and monitor the percentage bar on the screen.
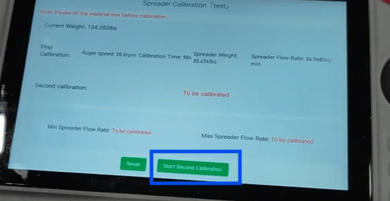
- After finishing, it will provide you with the Calibration results, including starting weight, calibration time, remaining weight, and show you how much weight of product was spread, shown as 'Spreader weight.'
- After reviewing the results, select 'Next'.
5. Reload Material for Maximum Flow Rate Calibration
-
After the minimum calibration is complete, reload the material that was just spread into the container back into the spreader tank.
6. Perform Maximum Flow Rate Calibration
- Select 'Start Second Calibration' to begin setting up the maximum flow rate.
-
Set the time for calibration to the lowest setting and the Auger speed material flow rate to 300-450, depending on what product, seed size, and density you are using.
-
Ensure there is enough product in the tank so that it does not run out of material during this calibration before reaching 100%. If it does run out before calibration is finished, it will be inaccurate, and you should redo the calibration.
7. Finalize Calibration
-
After calibration, check the remaining material in the tank.
-
Save the calibration results, which will show the minimum and maximum flow rates.
-
Adjust ratios if necessary or delete any failed templates.
8. Reinstall the spinner disc
- Align the 4 holes on the spinner disc.
- Tighten the locking piece back onto the bottom of the disc
- Reinsert the cotter pin to keep the disc on securely
Cautionary Notes
-
Ensure that there is sufficient material in the spreader during both calibrations to avoid incomplete calibration.
Tips for Efficiency
-
Consider having a second person assist during the calibration process for better efficiency.
-
Experiment with different densities and seed sizes to find the optimal settings for your specific needs.
Product Link
Click Here for a J150 Spreader System
Additional Article
Click Here for J150 Tank weight calibration article

Stay Informed: Subscribe to the Agri Spray Drones Newsletter
How to Subscribe
Subscribing is easy and takes less than a minute:
-
Visit Our Website
Go to www.agrispraydrones.com -
Scroll to the Bottom of the Homepage
Look for the “Subscribe to Our Newsletter” section. -
Enter Your Email Address
Type in the email address where you'd like to receive updates. -
Click “Subscribe”
Once you submit, you’ll be added to our mailing list and will start receiving valuable updates straight to your inbox.
Don’t Miss Out
Join thousands of ag professionals who trust Agri Spray Drones for the latest in drone spraying and precision ag.
Subscribe today — and let us help you take your operation to the next level.